How To Make Koji Rice From Scratch (Miso Paste Recipe Included!)
By Alex C
Senior Food Writer at Pro Home Cooks
Miso, at its most basic form, is simply a fermented bean paste but to get more specific, miso is made by mixing cooked soybeans with water, salt, and koji and allowing it to ferment for months to even years. “What is a koji?” you might be thinking. Well, it is the life force of every miso paste ever made. It is a steamed grain such as rice, soybeans, and/or barley that has been inoculated with a fungus called aspergillus oryzae. From here, the mold will take over breaking down the starches and protein of the soybeans into amino acids, fatty acids, and simple sugars. This fermentation process can span from many months to even years which will slowly and naturally change the flavor, color, and texture of the bean paste. What you will be left with is one of the most used seasonings in Japanese cuisine - miso paste. Click here to see the full video!

Although fermented bean pastes do take time and patience, it is actually incredibly forgiving and not as complicated as you may think it is. I will be walking you through the process of making your own homemade koji but this is totally optional. Most speciality Japanese stores sell already made koji so you can jump straight into the soybean phase of the process. There are only a few hands on steps before the actual fermentation process begins so let’s go through the whole process together!
Since we are making the most standard kind of koji, rice koji, we will of course be needing some rice. You can use any kind of rice but the koji mold prefers when you use long grain rice because it has more amylose than short grain rice. In order for the mold to cling onto the rice, it will need to be sterilized & cooked.

Pour 4lbs of long grain rice into a large container and let it soak overnight. The next day, bring a large pot of water with a steaming basket inside to a boil. Place your rice inside of a cheese cloth and tie it up. Steam for 50 minutes, flipping it once halfway through to ensure each grain is evenly cooked.

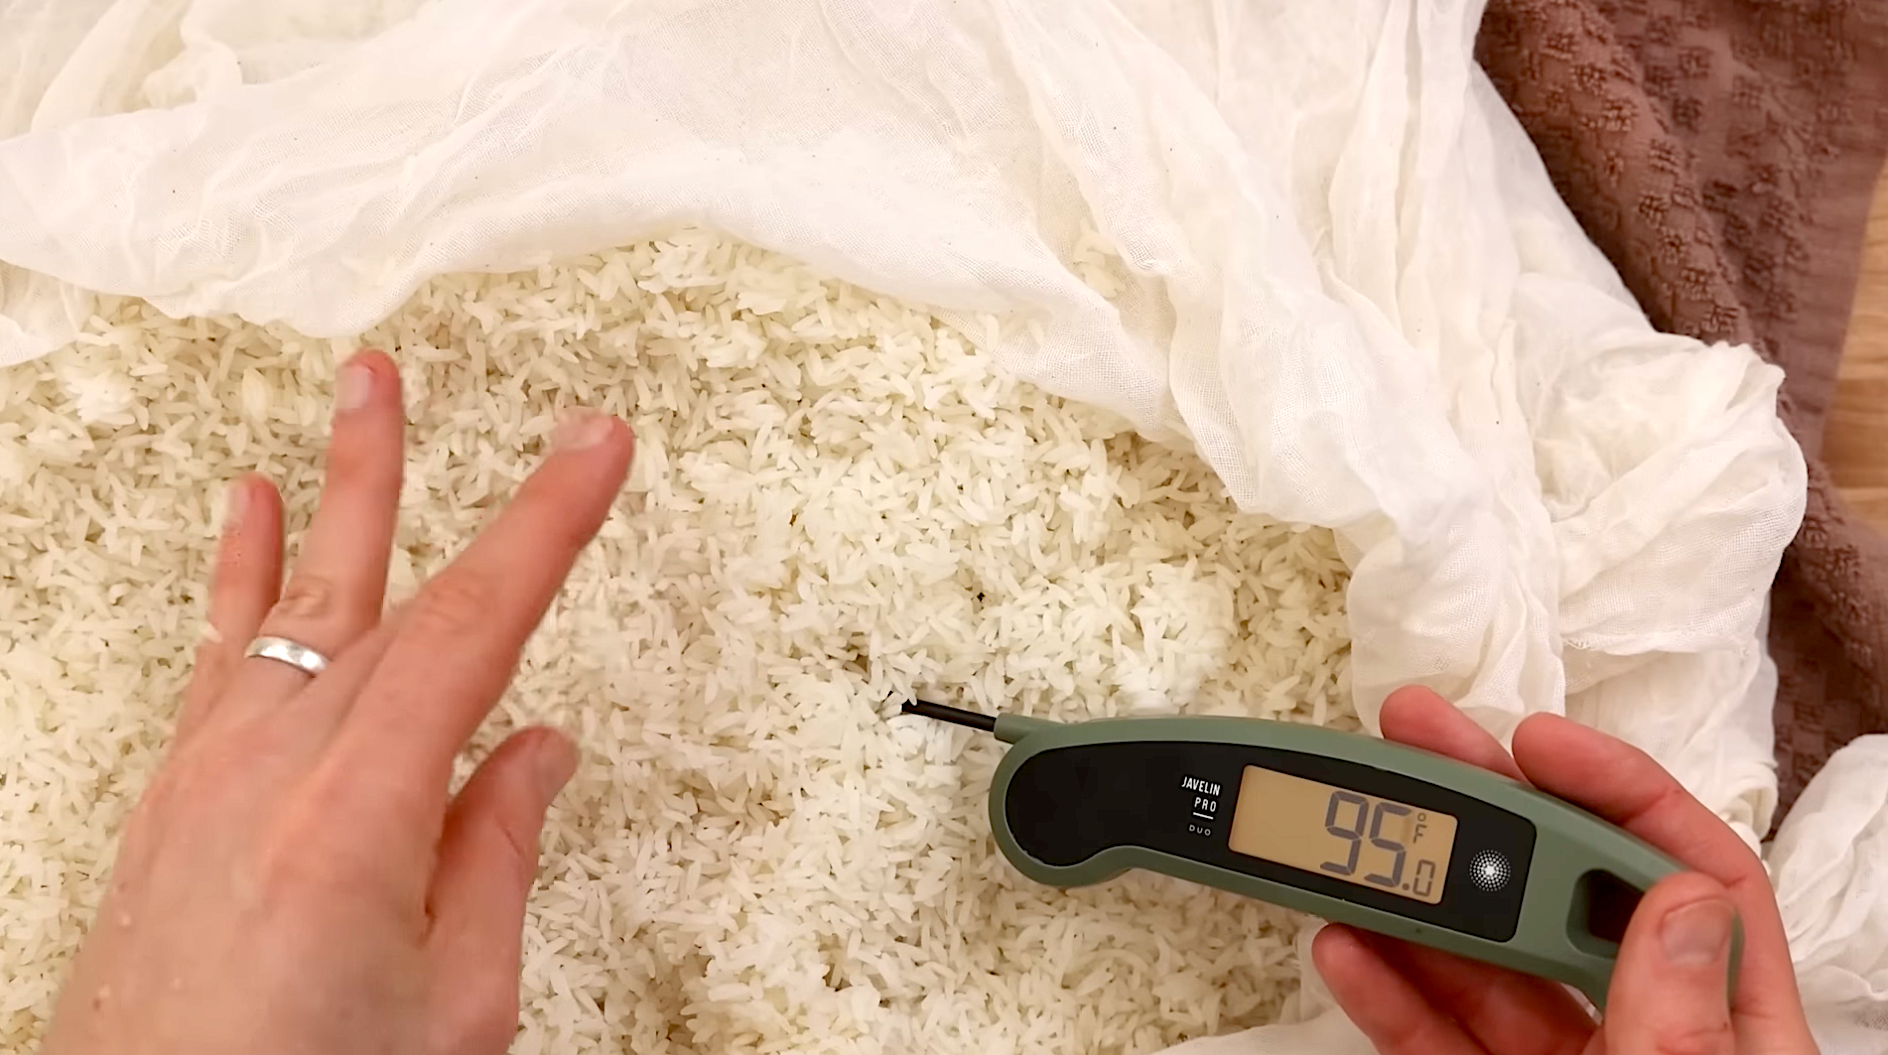
Steaming the rice allows you to separate each grain from each other so the mold can completely cover every grain. This isn’t the kind of rice you would want to have with a meal, it's pretty al dente but it's fully cooked through and gelatinized which is perfect for making koji. After the 50 minutes are up, let the cheesecloth cool down enough so that you can untie it and let the rice come down to 90 degrees fahrenheit. Once cooled, transfer all the rice to a large bowl and with clean hands, break up any large clumps.
Now it’s time to add the koji starter to the cooled rice! I’m using a koji starter from a company called Shared Cultures which comes in a 5 gram pouch and makes approx. 5lbs of koji rice. This is perfect for multiple fermentation projects but adjust my recipe according to your koji mold instructions as well as how much koji you’d like to end up with.
Using cleaned hands, I sprinkled the koji starter over the cooled and separated rice grains and slowly tossed everything together to evenly distribute the koji.

Next up, comes the tricky part. In order to inoculate the rice it needs to be in a warm and humid environment. Unless you live in a tropical country you will need to create an environment where the koji will thrive. So, start by evenly distributing the rice across a couple of sheet pans. Next, place a clean moist towel over the sheet pan and wrap everything up with some plastic wrap. Poke a few holes as to not suffocate the koji and place it in a warm spot in your house. I chose my dehydrator in my basement but I have used a heat mat before! The warmer the temperature, the more sweet notes you’ll get in your fermentation projects while the colder the temperature, the more umami notes you will get. I set my dehydrator temperature to 90 degrees F and let it sit for 16 hours. Check out how my koji looked like here!

Once the 16 hours is up, remove the plastic wrap & towel and mix the rice to make sure the mold is evenly spread out. Re-moisten the towel and place on top of the rice. Rewrap the plastic wrap back on and place it back in the dehydrator at 90 degrees Fahrenheit for an additional 16 hours.
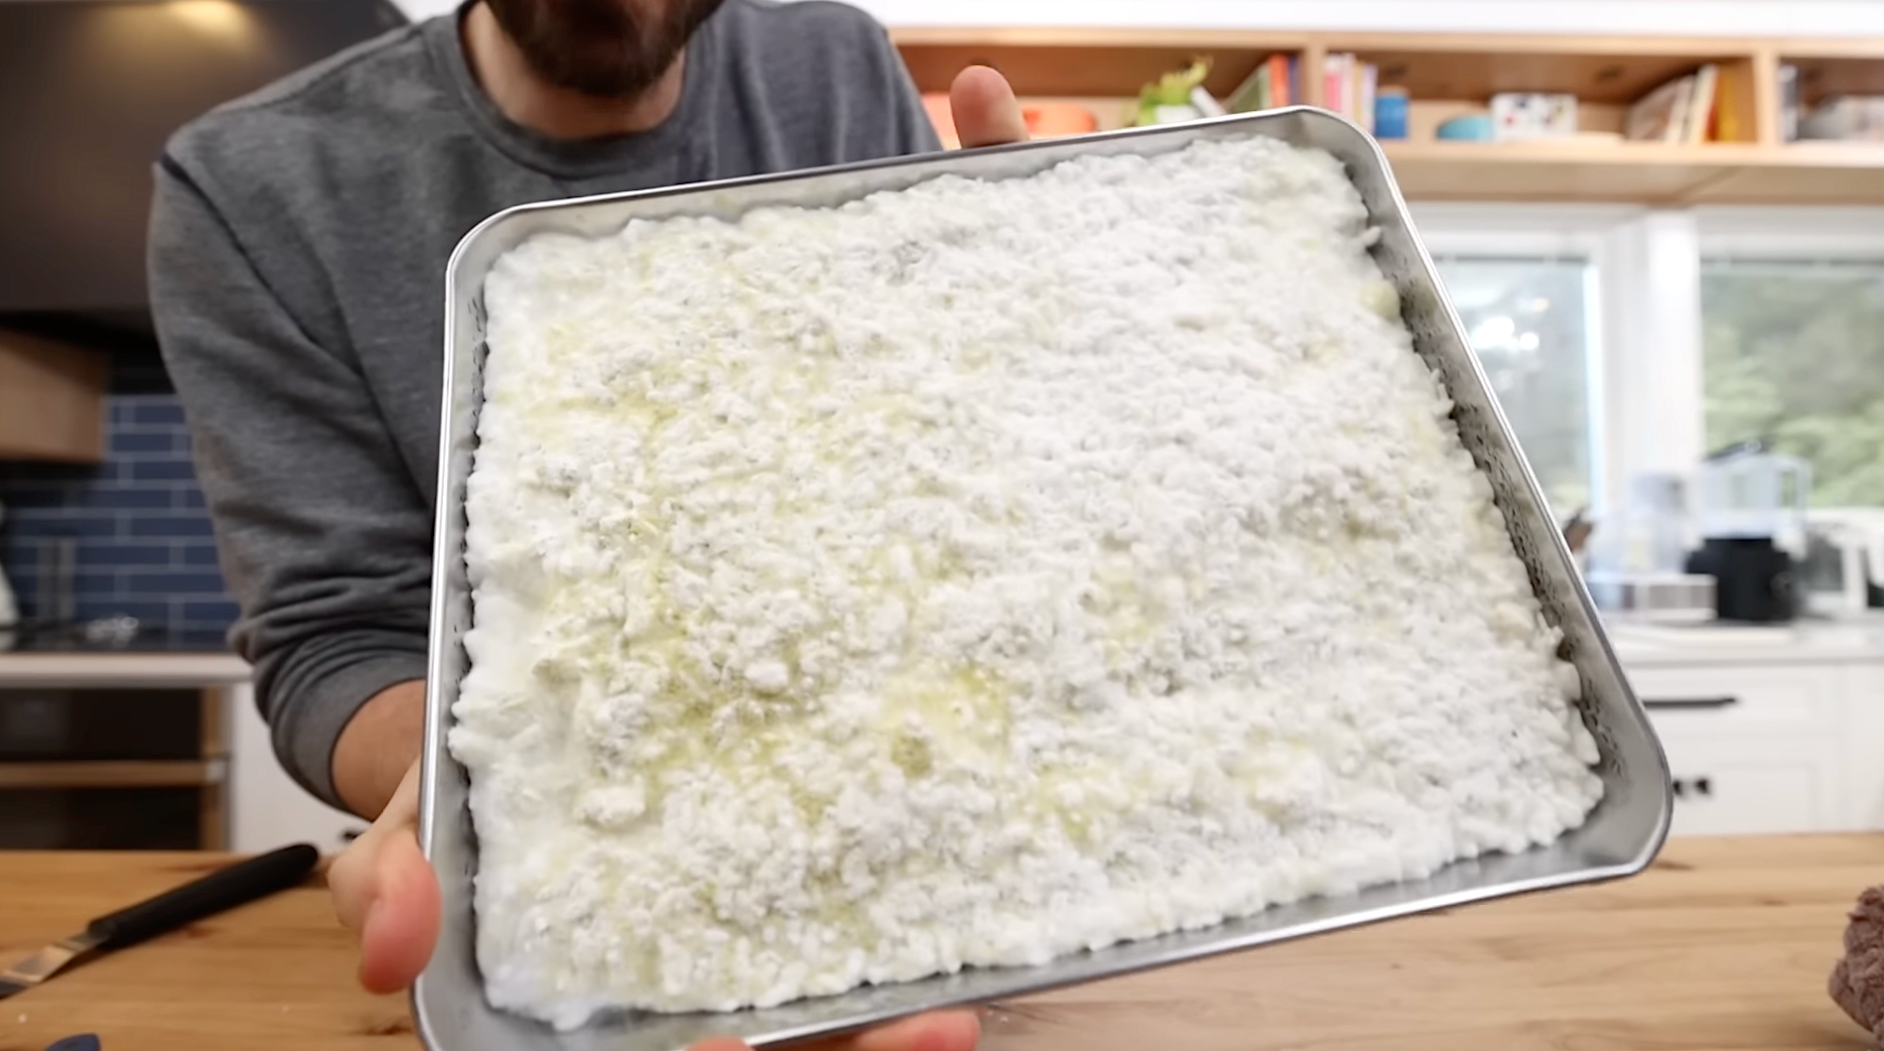
The following day, your rice should have quickly transformed into a mat of koji. You might see some yellowing and that just means that the spores are starting to develop. However, if it has turned green it means that it has gone too far and it is no good anymore. Break apart the koji and store it in a plastic container or bag. Congratulations, phase one is now complete!
Phase two commences… time to make the miso paste! You will only need three items: dried beans/legume, koji, and salt. Depending on the kind of miso you are going for you will adjust the ratios of the soybeans and koji. For example, a sweet miso will have a higher ratio of white rice koji to soybeans. This is because white rice is naturally sweet and adding an increased quantity will allow for a shorter fermentation time. A darker miso will have much less koji to soybeans so the fermentation time will be much longer allowing the flavor, color, and aroma to deepen. My miso paste recipe will be as follows:

Start by soaking 2 pounds or 900 grams of dried soy beans for 16 hours. They will double in size so make sure your container is large enough. The next day, pour the beans into a pot along with some extra water and cook the beans for 2 - 3 hours. The first 30 minutes you will have to scrape off the foam that rises to the top and after that give the beans a quick stir every 15-30 minutes as it cooks. Once the 2 - 3 hours are up, you will be left with soybeans that can be squished in between your fingers but not completely fall apart. To see the consistency of my beans check the full video here!

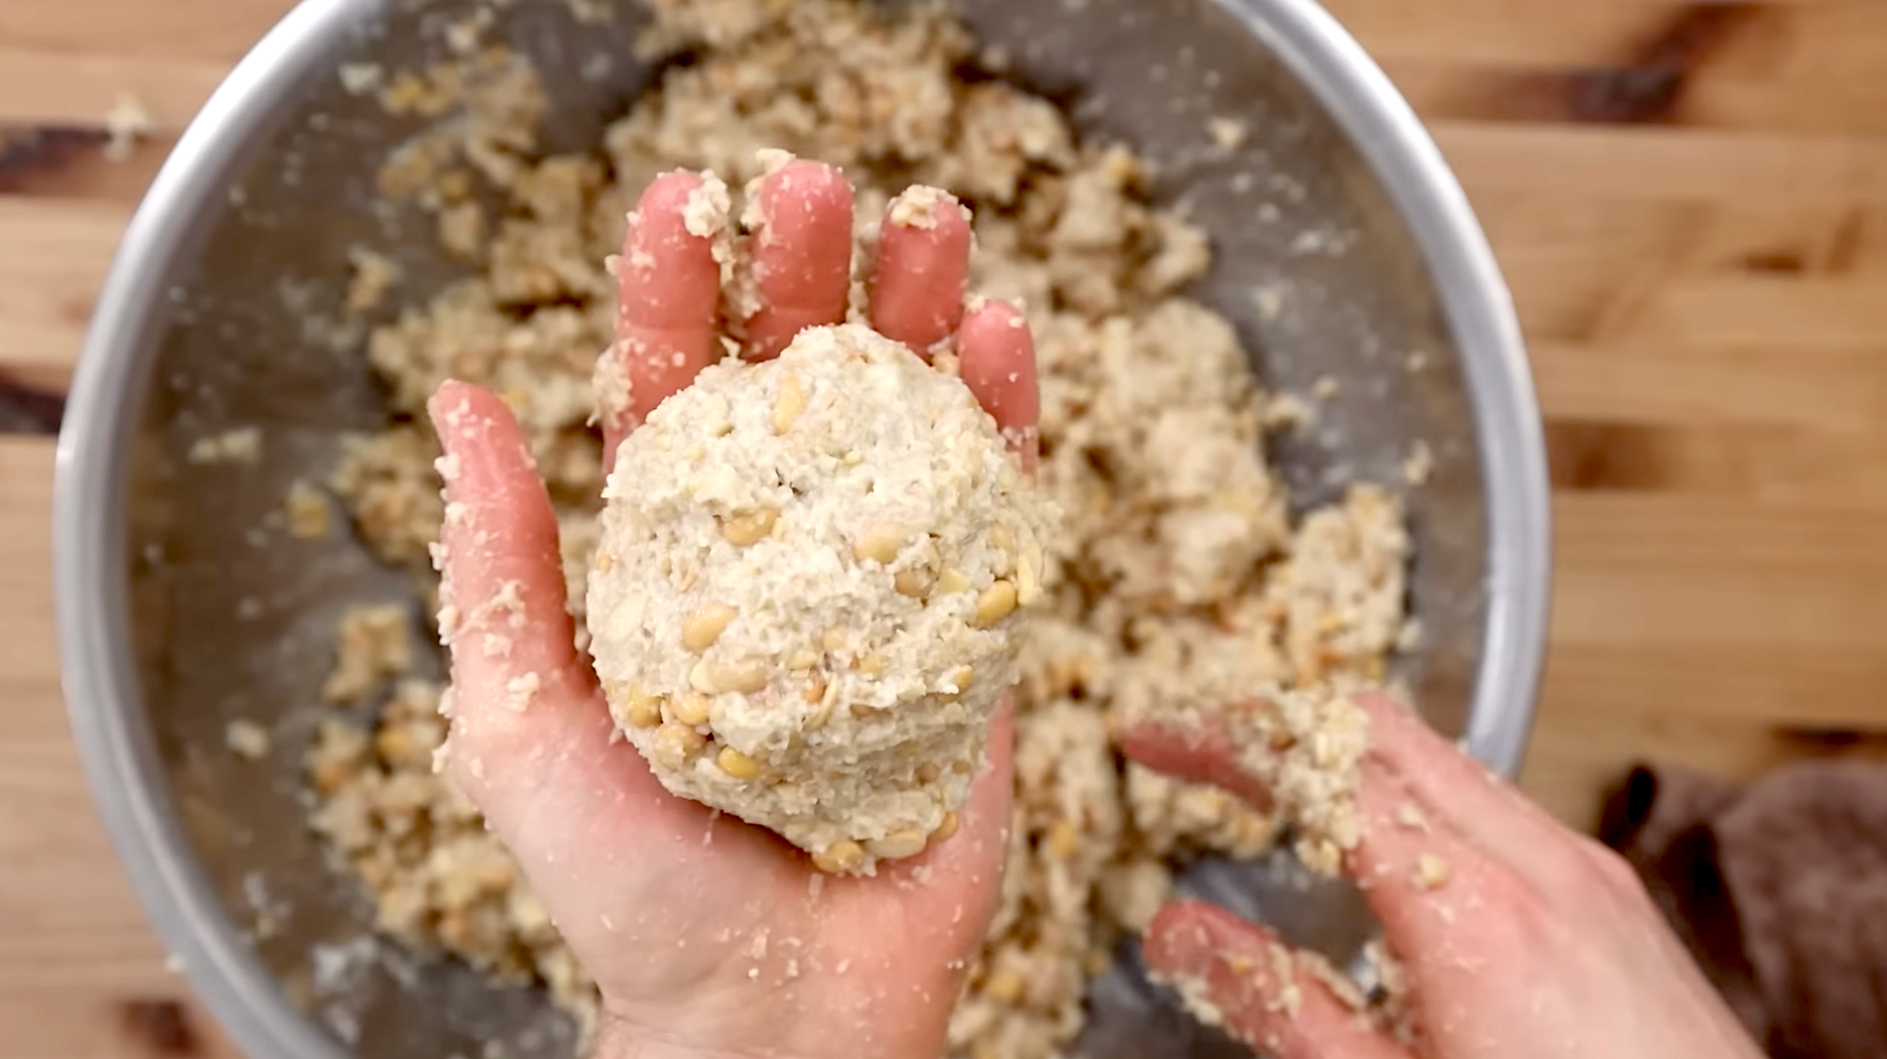
Drain the beans, reserving some liquid for later, and add them to a large bowl. Let them cool down to room temperature or to about 90F. Once cooled, add in 1350 grams of rice koji and 500 grams of salt. Using clean hands, mix and mash together the beans, koji, and salt. As things start to come together, it will feel a little dry so pour over 1/4 cup of reserved bean water to the miso paste. You might need more but the best way to tell is to form a ball of miso paste like this one here. The degree of wetness you are looking for is similar to that of wet sand.

Next, you are going to start forming baseball size balls of miso and place them inside a crock or a food safe plastic container. Check the bottom of this post to buy the crock I used! Traditionally, you throw the balls of miso paste inside the crock to ensure there is no air but since I didn’t have a lot of room I just tightly packed all the miso balls in. Once all the paste is in the crock, sprinkle over a final layer of salt for extra protection from any mold you don’t want growing on your miso.

Place a plastic covering over top and weight it down with weights or a bag of water. As the miso ferments, it will release CO2 which will leave air pockets that can potentially grow mold so you'll need to weigh it down. Finally, place the crock lid over top and put the crock somewhere fairly cold in your house. Traditionally, miso was put in the ground so the miso can go through the colder and warmer season as it ferments. However, if you are keeping your crock inside your home I would suggest somewhere cool.

From here, it's a waiting game! Let your miso ferment for 3 - 6 months while checking on it every couple days and before you know it you will have homemade miso paste ready to be enjoy! Check out the full video here for more information!
Homemade Miso Paste
Ingredients:
4 lbs of long grain rice
5 grams of koji starter
2 lbs of dried soybeans
1350 rice koji
500 grams of salt, plus more for finishing
Scale for weighing
Crock or container for storing
Weights for storing
Instructions:
Phase One: Making The Koji
- Pour 4lbs of long grain rice into a large container and let it soak overnight.
- The next day, bring a large pot of water with a steaming basket to a boil. Place your rice inside of a cheese cloth and tie it up.
- Steam for 50 minutes, flipping it once halfway through to ensure each grain is evenly cooked.
- After the 50 minutes are up, let the cheesecloth cool down enough so that you can untie it and let the rice come down to 90 degrees fahrenheit.
- Transfer all the rice to a bowl and with clean hands, break up any large clumps.
- Using cleaned hands, sprinkle the koji starter over the cooled and separated rice grains and slowly tossed everything together to evenly distribute the koji.
- Evenly distributing the rice across a couple of sheet pans. Next, place a clean moist towel over the sheet pan and wrap everything up with some plastic wrap.
- Poke a few holes so as to not suffocate the koji and place it in a warm spot in your house. I chose my dehydrator in my basement but I have used a heat mat before! I set my dehydrator temperature to 90 degrees F and let it sit for 16 hours.
- Once the 16 hours is up, remove the plastic wrap & towel and mix the rice to make sure the mold is evenly spread out. Re-moisten the towel and place on top of the rice. Wrap the plastic wrap back on and place it back in the dehydrator at 90 degrees Fahrenheit for another 16 hours.
- The following day, your rice should have quickly transformed into a mat of koji. Break apart the koji and store it in a plastic container or bag. Congratulations, phase one is now complete!
Phase Two: Making The Miso
- Start by soaking 2 pounds or 900 grams of dried soy beans for 16 hours.
- The next day, pour the beans into a pot along with some extra water and cook the beans for 2 - 3 hours.
- The first 30 minutes you will have to scrape off the foam that rises to the top and after that give the beans a quick stir every 15-30 minutes as it cooks.
- Once the 2 - 3 hours are up, you will be left with soybeans that can be squished in between your fingers but not completely fall apart.
- Drain the beans, reserving some liquid for later, and add them to a large bowl. Let them cool down to room temperature or to about 90F.
- Once cooled, add in 1350 grams of koji and 500 grams of salt. Using clean hands, mix and mash together the beans, koji, and salt.
- As things start to come together, it will feel a little dry so pour over 1/4 cup of reserved bean water to the miso paste. The degree of wetness you are looking for is similar to that of wet sand. You should be able to form a ball with the miso paste!
- Next, you are going to start forming baseball size balls of miso and tightly pack them inside a crock or a food safe plastic container.
- Once all the paste is in the crock, sprinkle over a final layer of salt for extra protection from any mold you don’t want growing on your miso.
- Place a plastic covering over top and weight it down with weights or a bag of water. Finally, place the crock lid over top and put the crock somewhere fairly cold in your house.
- From here, it's a waiting game! Let your miso ferment for 3 - 6 months while checking on it every couple days and before you know it you will have homemade miso paste ready to be enjoy!
TOP ARTICLES

By Alex C
Senior Food Writer at Pro Home Cooks
Published
Sourdough Baking School
Master the art of sourdough bread baking in the most comprehensive baking class on the internet. This class features over three hours of baking content to help you start your sourdough journey.
See More